
But, have you ever considered making your own? Armed with some basic craft skills and a few materials you probably already have at home, you can DIY anything from a basic flat collar to a Cuban link dog collar.
18 März, 2024
DIY Dog Collars: A Guide to Homemade Collars for Your Pup
The basic flat collar is the easiest to make and is the most versatile because you can use practically any durable material that’s long enough to fit your dog’s neck. You can use old belts, braided shoelaces, or any scraps of nylon webbing.
Plus, you can add decorative accessories like bandanas, rhinestones, or bells. No matter what you decide, you’ll need your chosen collar material, a D-ring for your leash, and your chosen locking mechanism. The easiest to use are snap buckles, which you can get from most hardware or craft stores.
Making flat collars requires some sewing skills because gluing them together might not be secure enough. When you have the correct-sized strip, loop an end into one side of the snap buckle, insert the D-ring, and sew the strip using 3-4 passes to keep them in place.
Do the same for the other side of the snap buckle. At this point, your flat collar is ready for use and can be decorated any way you want.
For a step-by-step tutorial, check out this DIY dog collar video.
Basic Collars

Martingale Collars
Martingale collars are similar to flat collars but require a little bit more hardware and a tad bit more effort. But, it’s all worth it, especially if you have a dog that can easily slip off their collars easily.
To make this, you’ll need to select the fabric you want to use and prepare both a long strip and a short one. Then, prepare a D-ring, two rectangle rings, and a triglide ring.
Once you have all that, all you need are your sewing materials, and you’re ready to begin.
Start by inserting the two rectangle rings into the short strip. Fold the ends over to make a loop and stitch them together, leaving a 3-inch flap.
Insert the D-ring into the flap and secure it by sewing the edge down. The work on your short loop is now complete.
Moving on to the large strip, slip it through both slits of the triglide and then fold the strip back around 2 inches and stitch it into place. Loop the 2-inch flap into one of the short loop’s rectangle rings and stitch it down.
Then, loop the other end into the short loop’s other rectangle ring and sew the edge down to secure it. If you pull on the D-ring and the long loop tightens, you’ve successfully made your own Martingale collar!
For a size guide and more detailed instructions, check out this DIY Martingale collar guide.
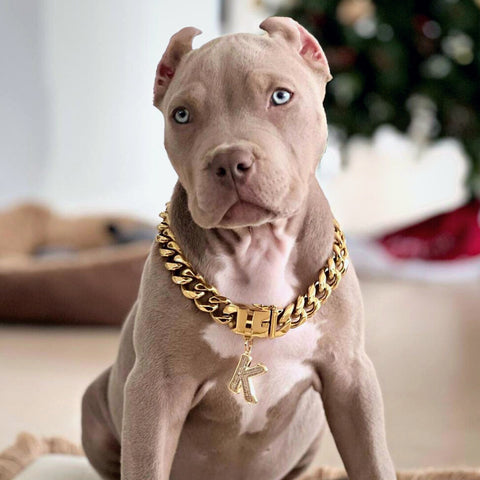
Gold Dog Collars
Gold dog collars are one of the most fashionable yet timeless canine accessories. You can make them yourself by finding a long enough chain link or getting some from your local hardware store.
If you want a choke collar for specialized training, you’ll need metal O-rings. But, if you just want a fashionable accessory, you can either use a screw link or carabiner, along with a single O-ring.
You should also get some gold spray paint if your chain isn’t in the color you want.
To make your own gold chain link collar, take your chain and make sure it’s cut to the right size. Using a pair of pliers, either attach an O-ring on each end for a choke-style collar, or use an O-ring on one end and the carabiner on the other for a lockable necklace.
This might be more challenging to do with Cuban links than regular chain links, but they really are more fashionable and definitely worth the extra effort.
For other dog chain designs, watch this DIY decorative dog collar video.
Making your own dog collars won’t just save you money. It’s also a fun project that will kindle your creativity. Whether the best collar for your pup is a flat collar or a dog chain, you can get custom-made ones at the exact colors and styles you want by simply making them yourself.